How to Build a Hipped Porch/Bay Roof

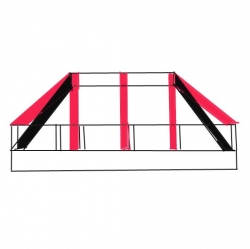
Build a hipped bay roof
This is a continuation of our How to build a Porch or Bay Roof but this time it is going to have what we call hipped ends so the sides of your roof slope in on the same angle as the front
This can save yourself hundreds if not thousands of pounds by doing your own roof framing, here we will go through some basics of roof construction to form a small bay window or porch roof, once you have the basics you can't beat getting plans for other projects like gazebos, sheds etc. just so you have specific designs to work to and by using the skills you will learn here combined with detailed drawings different projects become quicker and easier
What do we need
This article is going to cover a basic roof 8ft long by 2ft wide
Materials
7 lengths of 4x2 8ft long
1 length of 6x2 10ft long
1 8 foot x 4 foot sheet of half inch exterior plywood
10 4 inch screws and raw plugs
1kg of 3 inch round galvanised nails
Tools
Saw
Hammer
Tape measure
Pencil
Hammer drill
7mm masonry drill bit
Cheap basic calculator
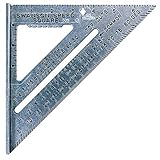
Roofing square
Tools to help
a selection of tools to help with the job in hand

First make the base
First make the base
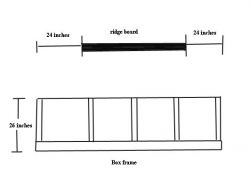
The first thing we need to do is make the base this forms our ceiling and a base to fit the roof rafters, this base can be as long and as wide as you need but for the benefit of this article we are going to make it 8ft long by 2ft 2 inches wide. We take 2 lengths of 4x2 and cut them at 8ft place them together and put a pencil mark on them every 2ft down the length, this should work out to 5 marks, and this is where we are going to put our ceiling joist. For our ceiling joist as we have established that we are going to make it 26 inches wide we need to cut 5 pieces at 26 - the thickness of our front and back plate which are 2 inches each which means we need 5 pieces at 22 inches. Put your first plate on the floor and place a ceiling joist at each end and on each marks and but your next plate up so it looks like you are making a ladder then nail it all together with your 3 inch nails. Next cut your plywood lengthways at 26 inches so you have a piece at 96 inches by 26 inches then place it on your box keeping all edges level and nail in place, this will be your ceiling and will keep your box square, turn it over with the plywood facing the ground and lift up and place on top of your bay window (if it is for your door you will need a brick pillar or a support bracket each side of your door to carry the base) centre it up to keep the overhang the same each side, we then need to drill and screw it back to the brickwork. The angle of your roof comes down to personal taste 45 degrees is easiest but 40 degrees looks better.
Setting the ridgeboard
Fixing Top Plate Ridge Board
We need to screw our top plate to the brickwork at the height we want our roof to be, a 40 degree roof is a 10 in 12 which means for every 12 inches the roof travels it rises by 10 inches, so if we measure the width of our roof base it is 26 inches - the thickness of the top plate which is 2 inches that leaves us with 24 inches, so if the roof rises 10 inches for every 12 it travels over 24 inches it will rise 20 inches, so from the top of our box we measure up 20 inches and fix our top plate so the top of it is level with this mark, because it is a hipped roof we need to shorten the top plate so we measure the distance from the front of our box back to the wall (26 inches) minus the thickness of our top plate (2 inches) which will give us 24 inches, from the end of our box we need to measure in 24 inches on the front and back plate and mark it, if we are measuring from the left hand side when we mark it put a cross on the right hand side of the mark, this shows us that when we fit our rafter to that mark it has to go just to the right of it, we then do the same from the right hand side measure in 24 inches towards the left put a mark and a cross on the left.
Now off the back plate where we put our marks we need to get our level and level up off those marks and draw a line up the wall, if we then measure between these lines it will give us the length of our top wall plate, cut to size and fix between these marks and level with the top mark
We then measure from our mark on the wall along our box to each one of the ceiling joist and transfer the measurements up to our top wall plate these marks will line up with your ceiling joist.
Making a rafter
How to Make a Rafter
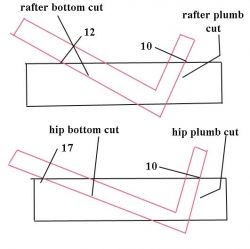
To make a rafter with the correct angles and length first we make a roofing square,(unless we have one) so get your off cut of plywood and go to a square corner, from the corner measure down one side 17 inches and mark it as base cut then measure from the corner again the other way 10 inches and mark it as top cut, next join the 2 marks together and cut the corner off.
Next get a piece of your 4x2 and lay flat put your ply template on with the number 10 and the number 12 level with the top edge of the 4x2 with base to your left and top to your right, now on the edge where it says base draw a line across the 4x2 and on the right where it says top draw a small mark at the top we then need to slide your template to the right still keeping 12 and 10 level with the top until we get the number 12 inline with the small top mark we just made when these are inline we then draw a line straight across the 4x2 on the right where it says top cut, remove your template and on your 4x2 right bottom on the left hand mark and top on the right hand mark, your rafter is now ready to cut, once cut use it as a pattern draw round it and cut 5 more.

Start framing your roof
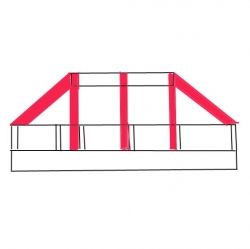
Frame Your Roof
Now your rafters are cut its time to fit them into place, get one at a time and sit it on your box with bottom mark at the bottom keep it level with the outside of your box and place it over a ceiling joist and nail in place, line it up with the mark on your top plate and nail in place and repeat with the other 4, making sure you have one fixed at each end of your top wall plate, with the 2 you have left these need to be fixed to the wall coming off the end of your wall plate down to your box.

Hip rafters made easy
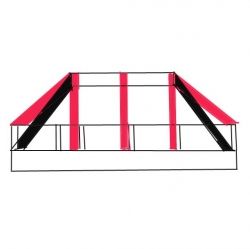
Make Your Hip Rafters
We make our hip rafters very similar to the way we make our normal ones with a couple of differences, our top cut is the main difference.
Firstly we get our square on the side of our timber this time with the number 10 and the number 17 level with the top and draw a line down the plumb side (number 10 side) and square it across the top. Now we measure the thickness of our timber (2 inches) off the plumb line we measure off it at a 90 degree angle 2 inches and then mark another plumb line and again square across the top, turn your timber on edge and with the 2 lines on the top join up the diagonals, now we need to cut what we call a compound mitre, we need to cut across the top diagonal and down the plumb cut on the side at the same time then repeat with the other diagonal and plumb cut so we end up with a point.
Hip Rafter length
To work out the hip rafter length get your square and measure between the number 17 and number 10 it should measure 19 ¾ inches (19.72) then divide by 12 = 1.643, measure the distance from the front of your box to the wall less the thickness of your ridge board which is 26 inches – 2 inches =24 inches multiply this by your 1.643 which will give you 39.44 basically 39 ½ inches, this is the length of your hip rafter, so you now need to have your rafter on its side for arguments sake keep the point to the right and measure from the point leftwards down the length 39 ½ inches and put a mark, now get your square and put the number 17 on the mark and the number 10 level with the top this time we draw a line down the 17 side of the square (base) cut on this mark and we have our first hip rafter, repeat the same process for the other one.
The final bit
Now take your hip rafter to the corner of your box and slot in between your 2 normal rafters at the top and bring down to the corner and fix in place.
Your basic construction is now complete it needs a facing board on the front and sides which we use to fix the guttering to, the facing board needs to be 2 inches deeper than our front plate, as we used 4x2 our facing board needs to be 6 inches deep and 1 inch wide, it is fixed to the front and sides level with the bottom so it sticks up 2 inches this is to give the bottom tile a little tilt helps the following tiles sit properly and slow the water down a bit before it meets the guttering.
Congratulations you are now ready to felt and tile your new roof you have just saved the best part of a thousand pound and its time to save another one if you are going to tile it yourself as well.
For roof basics run and rise basics of roof construction or see our other lenses


